Key Takeaways
- To run an executable file without admin rights, launch PowerShell, type the ampersand (&) symbol, press Spacebar, enter your EXE file’s path in double quotes, and press Enter.
- To launch an EXE file with admin rights, use the “Start-Process FilePath “powershell” -Verb RunAs” command where FilePath is the full path enclosed with double quotes to your executable file.
Windows’ PowerShell utility isn’t just for advanced tasks; you can use this tool to launch your executable (EXE) files as well. This means you can open your favorite apps right from a PowerShell window on your Windows 11 or Windows 10 PC. We’ll show you how to do that with or without admin rights.
If you’re launching an app that requires admin rights, such as an app installer, run your executable with admin rights. However, if you’re launching an installed app (which likely doesn’t need admin rights), open the file without the admin rights.
Why Open EXE Files With PowerShell?
While the easiest way to launch files on Windows is to simply double-click your files, the usage of PowerShell to open files is handy in some cases.
For example, if your File Explorer utility isn’t working and restarting Windows Explorer hasn’t fixed the issue, you can use the PowerShell method to launch any executable file.
Another reason you may want to use a PowerShell command to launch files is if you’re writing a script. You may want to open a file in your script, which you can do by including the above PowerShell commands.
How to Launch an EXE File Without Admin Rights Using PowerShell
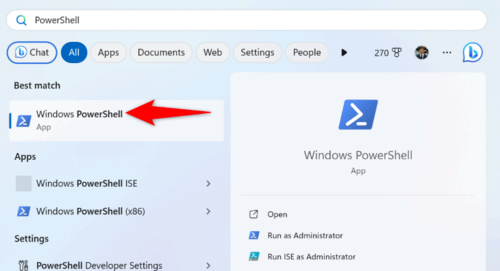
To start, open your PC’s Start Menu, find “PowerShell”, and launch the utility.
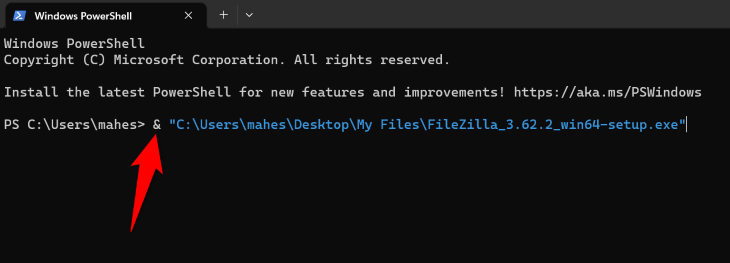
In PowerShell, type the ampersand (&) symbol, press Spacebar, enter your executable file’s path, and press Enter. If your file path has spaces, enclose the path with double quotes.
If you’re unsure how to locate your program’s file path, simply drag and drop your file onto your PowerShell window to automatically fill the file path. Another way to find a file’s path is to right-click the file, select “Properties,” open the “Details” tab, and look at the “Folder Path” value.
As an example, if you want to run a file named “FileZilla_3.62.2_win64-setup.exe” stored in a “My Files” folder on your desktop, you’d use a command that looks something like the following:
& "C:\Users\mahes\Desktop\My Files\FileZilla_3.62.2_win64-setup.exe"
PowerShell will launch your specified executable file, and you’re all set.
How to Launch an EXE File With Admin Rights Using PowerShell
To run an executable file with admin rights in PowerShell, simply make a few changes to your command, and your file will launch with administrative privileges.
To do that, launch a PowerShell window on your PC. In this window, type the following command, replacing “FilePath” with your file’s full path, and press Enter:
Start-Process FilePath "powershell" -Verb RunAs
Although you only need to enclose the path with double quotes if the path has spaces, it’s a good practice to always use double quotes; it doesn’t cause any issues.
As an example, to run a file named “FileZilla_3.62.2_win64-setup.exe” stored in a “My Files” folder on your desktop with admin rights, you’ll use the following command in PowerShell:
Start-Process "C:\Users\mahes\Desktop\My Files\FileZilla_3.62.2_win64-setup.exe" "powershell" -Verb RunAs
PowerShell will launch your file with admin privileges, and you’re all set.
And that’s how you run your apps with or without admin rights from PowerShell on a Windows PC. Enjoy!


