Online privacy is a massive concern, and for good reason, given the steady stream of headlines about data breaches, phishing scams, identity theft, and online stalking. Even major apps like Instagram aren’t impervious to hackers or data infringements, which is why you must understand what’s available to beef up your profile security and privacy.
Why Instagram Privacy Matters
Instagram users face privacy threats on multiple fronts. There’s the general concern of managing a publicly accessible profile, but there are also forces at play behind the scenes, such as third-party ad servers, bots, and potential hackers.
The thought of maintaining privacy in the digital age can get overwhelming, but within the past few years, there has been mounting pressure from activists and governing bodies toward companies like Meta to protect users. The pressure has spurred action, and there are many available settings to enhance privacy efforts.
You have options, but the trick is to know where to look because it’s not always obvious. Here are eight very useful settings you can access right now to boost your privacy from multiple angles. You can do these either through the Instagram website or through the app on your phone or tablet.
Make Your Profile Private
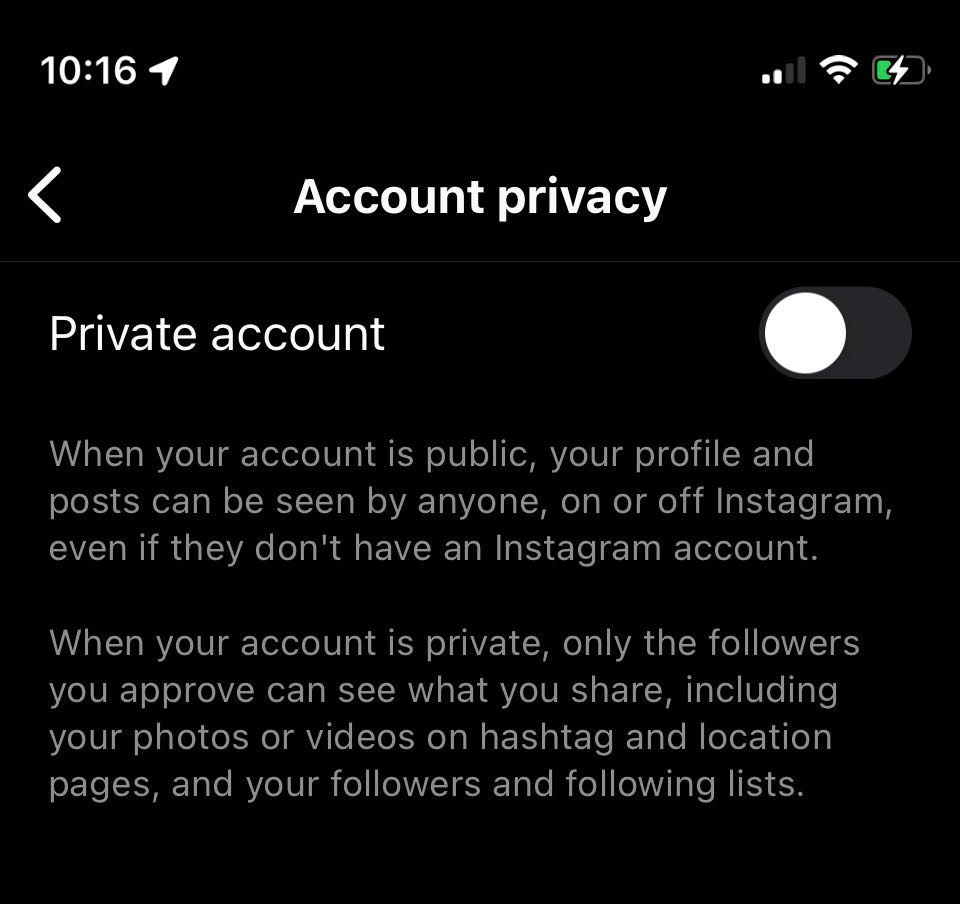
Sure, setting up a private profile is an obvious step to take, but it’s the easiest and most effective thing you can do to control who is viewing your account. By switching to a private account, only those you allow to follow you can view, comment, and interact with your posts and stories.
To make your account private, go to your Instagram profile, click the three dots in the follow this path: Settings and Activity > Account Privacy.
From there, toggle the option to make your account private, and you’re all set.
Block or Restrict Users, Posts, and Comments
Perhaps you want your profile to be public, but a specific account is harassing you. Not to worry—Instagram lets you block individual users. To do this, go to their profile and click the three dots in the upper right-hand corner. You’ll see these options in red letters at the top of the list:
To block the user, simply press the button, and they’ll no longer be able to interact with your profile. However, you can also use the restrict function to prevent users from only performing certain functions, such as commenting on your posts or messaging you.
Lastly, the “Report” option allows you to draft a completely anonymous message to Meta to report intellectual property infringement, harassment, or dangerous behavior.
Update Your Story Settings
If you’re one to post stories, there might be times you want to share something but would rather not share it with everyone. When you go to create a story, you can click the cog icon in the upper-right-hand corner and then press “Story.” Here, you can choose from a range of privacy settings.
Instagram Story Settings
The close friends list allows you to post stories only visible to a group of chosen followers. You can also create a list of followers you wish to hide your stories from and control whether or not you allow people to reply to your stories.
Cut Off Location Sharing
For this one, you have to go off the Instagram app on iPhone or Android. Turning off location sharing is important because, to some extent, Instagram is tracking where you are, and uses this data to serve targeted ads and build out your personalized “Four You” page. However, if you’d rather them not know your whereabouts, you have the power to ditch the geo-tracking
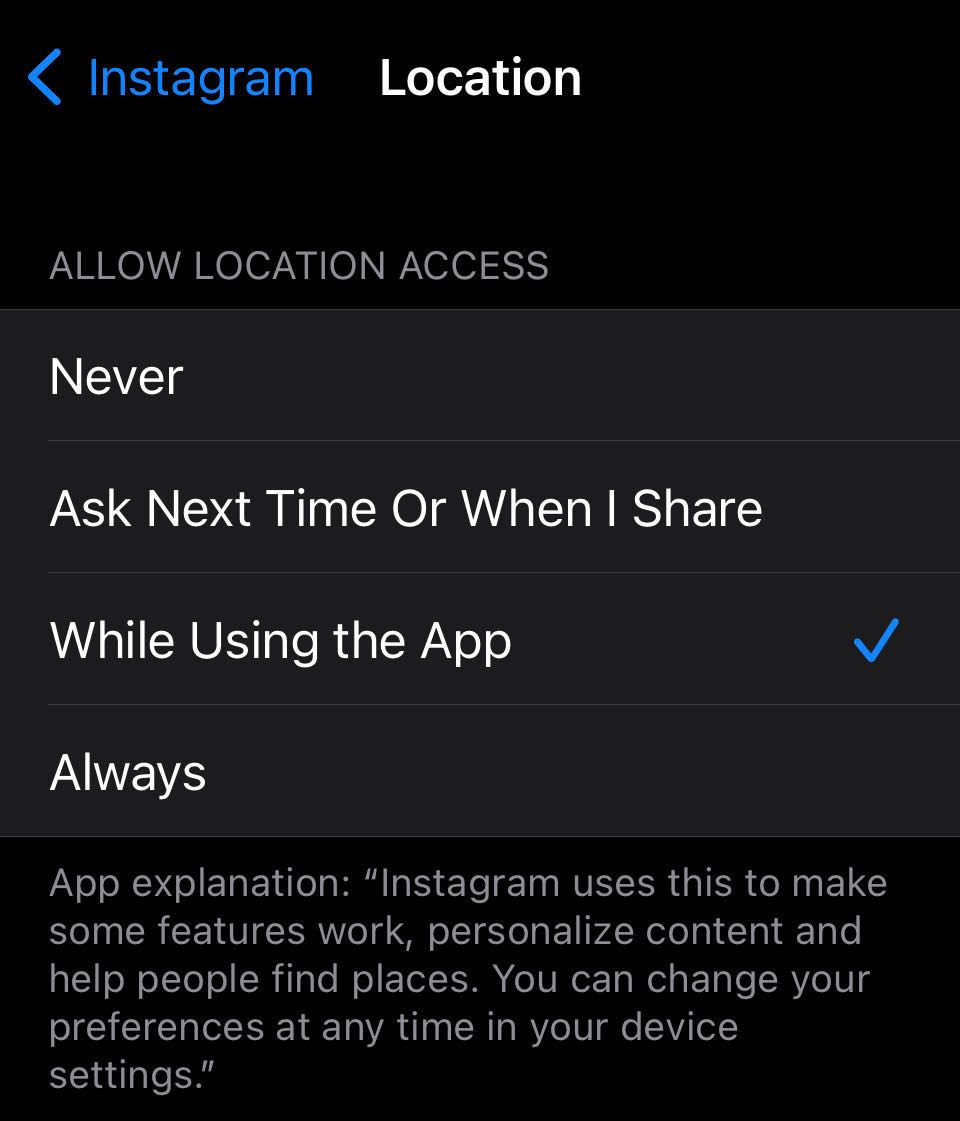
First, enter your phone’s system settings and navigate to the “Location” permission area. The example below is for an iPhone, but you can do so with other smartphones, the process just may be a bit different.
Open up general settings and scroll down until you find Instagram. For iPhone users, location settings will be the first option on the list, where you can select from a few location preferences, including asking never to track you.
Hide Activity Status
When you’re on Instagram, others can tell by a little green dot next to your profile image. This is called the “Activity Status.” To turn activity status off, go to Settings and Activity > Messages and Story Replies > Show Activity Status.
The default is for activity status to be on, so toggle the switch off, and you are free to scroll to your heart’s content without anyone else knowing.
Enable Two Factor Authentication
Security experts unanimously urge users to enable two-factor identification (2FA), as it’s an excellent method to avoid being hacked.
As the name implies, 2FA adds another layer of authentication on top of your password, meaning even if someone uncovers your password, they’ll have to go through an extra stage to trick the system into thinking it’s you. While it’s never guaranteed, 2FA essentially eliminates basic brute-force attacks.
To set up 2FS, open your account settings. Then follow the path: Accounts Center > Password and Security > Two-Factor Authentication. From there, set up 2FA according to your preferences, such as having Instagram send you an SMS code or going through a third-party service, like Google Authenticator.
Adjust Ad Preferences
Sometimes, giving data over to advertisers is preferred, but that’s up to your discretion. Instagram now allows you to control how your data is gathered and used in the app.
To begin, open Instagram and go to Settings > Accounts Center > Ad Preferences. At this point, you have a few options. You can turn off Instagram’s activity-based ad serving by going to Manage Info > Activity Information From Ad Partners. This section also offers some helpful resources to understand more about your data, privacy policies, and the nature of Instagram’s ad partnerships.\
If you still want some data-based discovery but want to control over you see, you can select “Ad Topics” to control what types of sponsored posts you wish to see.
#8 Approve Tagged Posts Manually
Default settings allow any account can tag you in a photo, but Instagram allows you to control this. To set up tagging preferences, go to the privacy settings and select “Tags.” From there, you can switch tagging from automatic to manual, so you get to approve what you’re tagged in before it’s public.
If you’ve already been tagged in an image or video but would rather not be, when in the tag settings, hit the “Hide Photos and Videos” option. From there, you can select the posts you want to be removed from.


