Staying regular with your driver updates plays an important part in making your PC run well. Whether you own an AMD graphics card or one of AMD’s top processors, GPU and chipset drivers can be quite impactful, affecting the performance of your PC.
Good news: Updating your AMD drivers is easy, no matter the method or the exact type of driver you need. Check out our step-by-step guide to updating AMD drivers.
Jacob Roach / Digital Trends
How to update GPU and chipset drivers with AMD Auto Detect
If you want to update your AMD drivers with minimal hassle, your best bet is to use AMD’s software that will automatically detect your hardware and suggest matching drivers. This can be used to update both your GPU drivers and your chipset drivers, making it a versatile tool.
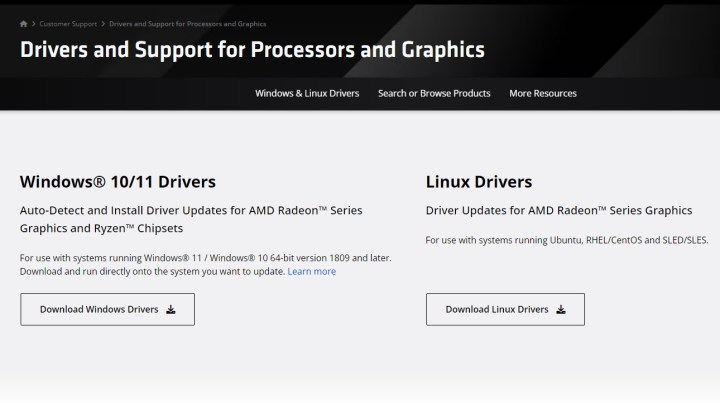
Step 1: AMD’s Auto Detect and Install tool is readily available on its website, so head over there to download it.
AMD
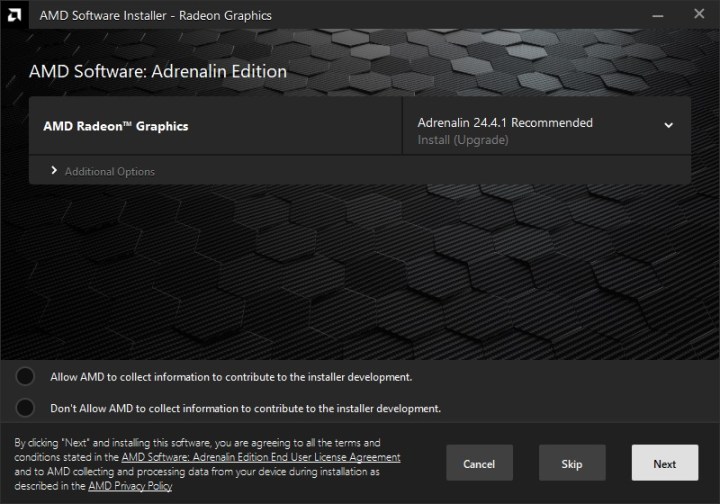
Step 2: Let the tool scan your PC — this might take a while and may go faster if you shut down other software. Once the scan is over, AMD will tell you which drivers are available for your PC.
Once drivers have been found, you can choose to Skip them or Install them. Before clicking on Install, feel free to tap on Additional Options to select the install type and location. AMD also has a handy option that lets you perform a factory reset on your drivers, and it’s tucked away under Additional Options. This is a way to fully remove the driver and perform a clean install without having Windows automatically supply you with a backup driver, which it typically tends to do.
Monica J. White / Digital Trends
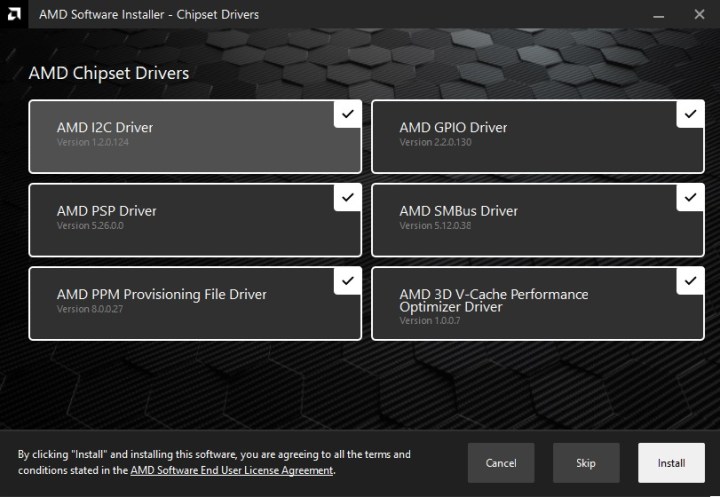
Step 3: GPU drivers will appear first, and this applies even if you don’t have a discrete graphics card from AMD, as integrated GPUs also get drivers. Next, you will get chipset drivers if you also have a Ryzen processor. Tap on the ones you want to skip to deselect them, then press Install to begin the process.
Once the installation is over, restart your PC to finalize the changes.
Monica J. White / Digital Trends
Jacob Roach / Digital Trends
How to update AMD GPU drivers with AMD Adrenalin
Perhaps the second easiest way to update your GPU drivers is to do it with AMD’s own utility dubbed AMD Software: Adrenalin Edition. Chances are that if you have any AMD drivers installed, you already have Adrenalin, too, but if not, we’ll talk you through downloading it and ensuring that your graphics card drivers are up-to-date.
Adrenalin doesn’t currently offer the option to download chipset drivers, so if that’s what you’re after, follow the steps above or scroll down for a guide on manual installation.
Step 1: If you don’t have AMD Software: Adrenalin Edition (which we will simply refer to as “AMD Adrenalin” from now on) installed on your PC, your first step should be to download it directly from AMD. Follow the setup instructions provided during the process to install it on your PC.

AMD
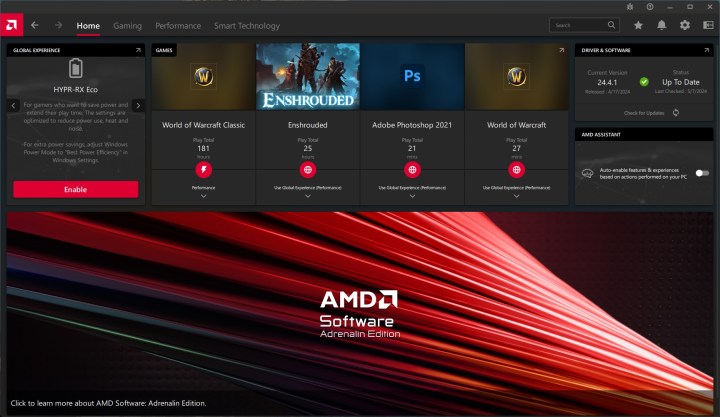
Step 2: Launch AMD Adrenalin by right-clicking on your desktop and selecting it. You may be asked to create an account and sign in. The Home screen shows a variety of interesting things, such as the games you play the most or your current graphics profile, but what you really care about is the Driver section, which you’ll find on the right-hand side of the screen.
Monica J. White / Digital Trends
Step 3: On the left-hand side of the Driver section, you’ll see your current graphics driver and its status. Tap on Check for Updates to see if any new drivers are available to you.
Tip: While you’re in here, you can toggle Check for Updates to Automatic in order to let AMD get the drivers for you when they’re available.
Step 4: If any GPU drivers are available, you can download them directly within the software. We recommend turning off other programs to make the installation process smooth.
Jacob Roach / Digital Trends
How to manually download AMD drivers
Be it GPU or chipset drivers, you may want to skip all the extra software and do it your own way. Fortunately, manual driver installation is still as easy as pie.
Step 1: Before you can install any drivers, you need to know the type of hardware you’re running. As you’re most likely looking for GPU or CPU drivers, check out our guides to finding out your graphics card model and your processor model.
Keep in mind that you don’t really need to install CPU drivers on their own unless AMD happens to have something to offer. Instead, look for chipset drivers.
To figure out your chipset, follow our guide to checking your PC specs.
Step 2: Once you know what you’re after, it’s time to go ahead and download it. AMD has a joint website for all of its drivers, and if you already read our previous steps, you’ve been there to download the Auto Detect tool.
To download your driver, navigate to AMD’s website and select the type of driver you’re after. This includes graphics, processors, accelerators, chipsets, and cloud graphics, but you’re most likely there for the graphics or the chipset driver.

AMD
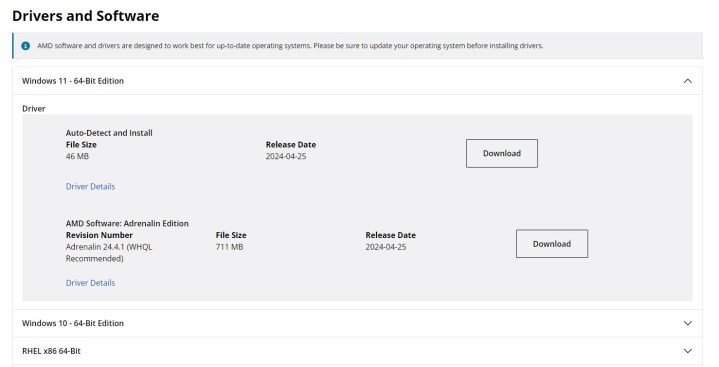
Step 3: Next, choose the family of products that you’re using. For instance, if you have an AMD Radeon RX 7800 XT graphics card, tap on Graphics followed by Radeon RX, followed by Radeon RX 7000 Series. In the final step, choose the exact model of GPU that you own. Press Submit and then select your operating system to download the correct file.
At this point, AMD is once again letting you download Auto-Detect and Install instead of manual installation, but just choose AMD Software: Adrenalin Edition followed by a driver version number to get the driver on its own.
AMD
Step 4: Once you’ve downloaded the file, launch the installer. The software will check for compatibility and then suggest drivers for you to install. Simply click Install if you don’t want to make any changes, or Additional Options to choose a factory reset instead.
You may also be prompted to download and install additional software from AMD, which you can, but don’t have to do. Follow the steps in the tool until the installation begins.
AMD will then install your new drivers, which may take a moment. To finalize the process, restart your PC.
Editors’ Recommendations


