You rely on your MacBook for just about everything, so don’t you think it’s important to keep its battery topped off? After all, it is laptop, and while laptop batteries are stronger than ever these days, your MacBook likely won’t last a full day without its power adapter. But how does one know exactly how much juice a MacBook has left? Why, with the battery percentage indicator!
By default, you’ll find this status icon in the top-right corner of your MacBook screen, but maybe you’ve accidentally disabled it. No worries: our step-by-step guide will teach you how to get it back, as well as answer some frequently asked questions.
Enabling the Mac’s battery percentage indicator
There are a few ways to enable the battery percentage indicator for your Mac, but how you’ll go about enabling it will depend on what version of MacOS you’re running. For starters, let’s cover the two latest versions of the Apple OS: Sonoma and Ventura.
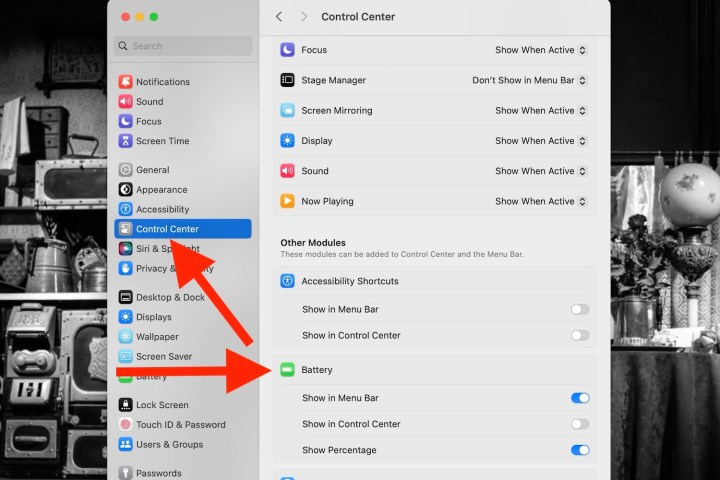
Step 1: Open System Settings, then click Control Center > Battery.
Step 2: You should see a Show Percentage option. Go ahead and toggle this on.
Digital Trends
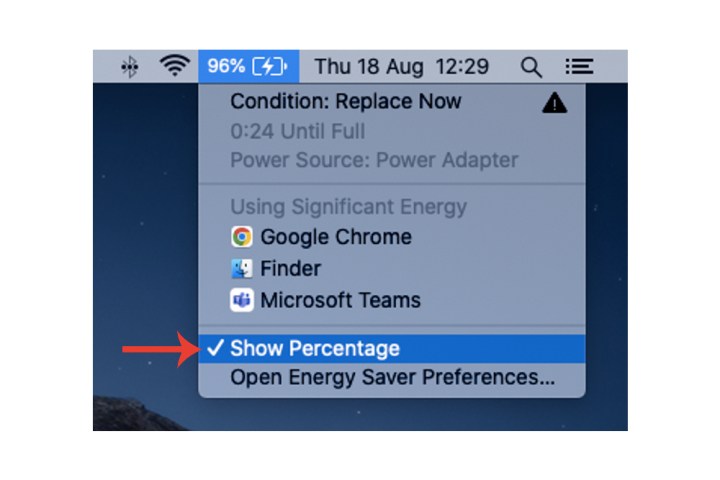
Step 3: For Catalina users and older MacOS versions, select the Battery icon on the top-right of your Mac and then choose the Show percentage option.
Digital Trends
Enabling the Mac’s battery icon
If the battery icon is not showing up at all on your Mac, then here’s how to fix that.
Step 1: For the latest MacOS versions (Sonoma and Ventura), click System Settings, then click Control Center > Battery.
Step 2: Toggle on the Show in menu bar setting.
Digital Trends
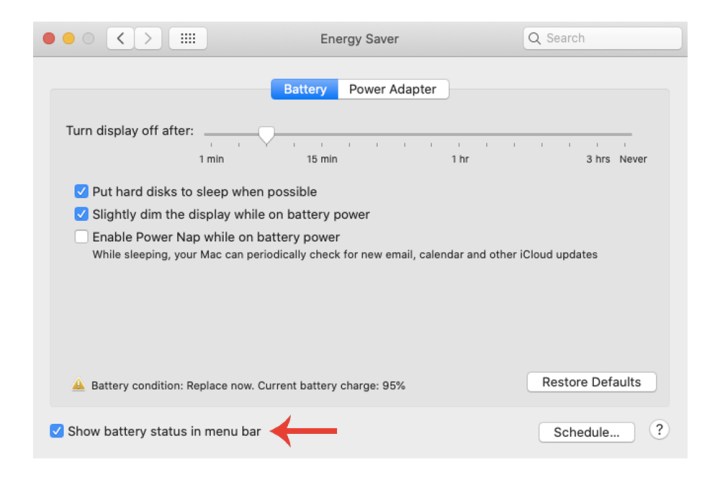
Step 3: For those who have Catalina or below, select Energy saver within System preferences, and then tick the Show battery status in menu bar box at the bottom.
Digital Trends
Step 4: If your computer is running Big Sur or Monterey, select the Battery icon within System preferences instead. Now choose the Show battery status in menu bar option.
Configuring Energy Saver settings
If you find your Mac’s battery constantly depleted and want to better preserve and optimize the system’s battery usage, then you can do so via Apple’s Energy Saver settings.
Do note that the Energy Saver setting was removed in Sonoma.
Step 1: Select Energy saver from System settings (for Ventura users) or System preferences (for all other OS versions), and then adjust the settings to your liking. You have a few options to choose from via the Battery tab:
- Turn the display off after a specific amount of time.
- Put hard disks to sleep when possible.
- Slightly dim the screen when the Mac is not being charged through a power outlet.

Digital Trends
Step 2: Adjacent to the Battery tab is Power adapter. Here, you also have a few settings you can turn on and off as well:
- Prevent the computer from sleeping automatically when the display is switched off.
- Put hard disks to sleep when possible.
- Wake the Mac for Wi-Fi network access.
- Enable Power Nap while plugged into a power adapter.

Image used with permission by copyright holder
Step 3: A Schedule button on the bottom-right of the window can also set an exact time to start up/wake your system, in addition to when it automatically goes to sleep.
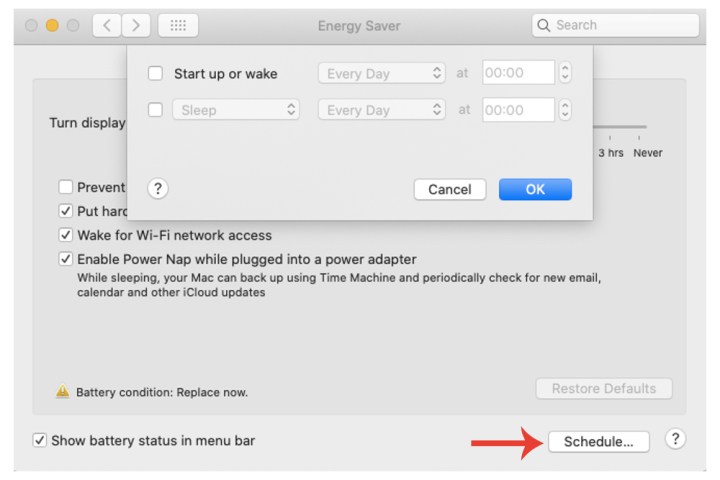
Image used with permission by copyright holder
If you want to see the overall health of your Mac’s battery itself, then be sure to check out our guide on that as well as our article on how to show the battery percentage on your iPhone.
Editors’ Recommendations

