Key Takeaways
- To view all ACL entries for a file, use the command ‘getfacl filename’ but replace ‘filename’ with the name of your file.
- To set a new ACL entry for a file, use the command ‘setfacl -m u:username:rwx filename’
- To set a Default ACL entry on a directory, use the command ‘setfacl -d -m u:username:rwx dirname’
Are you in charge of a shared file server between multiple groups of people, who all need varying access? In this tutorial we’ll go over the basics of ACLs and employ them in a fictional office scenario.
What Are ACLs?
Access Control Lists (ACLs) supplement the standard file system permissions model on Linux and Unix. In a nutshell, they allow you to go beyond the “user/group/other” concept to create additional sets of permissions for files and directories. They also do neat things like automatically applying permissions to new files and directories. But first, let’s cover some basic Linux file system permissions concepts in which ACLs work alongside.
Standard File System Permissions
To understand file system permissions under Linux, first you need to know that Linux is a “multi-user operating system”. This means there exist multiple user accounts which essentially allow more than one person to log into the system, each having their own freedoms and restrictions.
Some user accounts are “system” accounts; not ones that are used by a person, but rather by a piece of software, for instance. Processes run under these special accounts to allow and restrict them to various parts of the OS, just as a normal user account would.
Now that we understand users, I can introduce you to “groups.” Groups are pretty easy to understand—they’re simply collections of existing users. To assign permission for a resource to lots of users at the same time, you can create a new group and grant specific users membership to that group. You then assign permission for the resource to the group, instead of each individual user. This makes administration easier and more streamlined.
OK, let’s talk about files and directories. These are the resources we care about granting and protecting access to.
Most Linux file systems (EXT4, XFS and ZFS for example) allow you to apply 3 primary permissions to files and directories. These permissions are:
- Read: Allow a file to be read (or list contents inside a directory)
- Write: Allow a file to be written to or modified (or create files and subdirectories inside a directory)
- Execute: Allow to run a program or script (or enter into a directory, for example with the cd command)
All files and directories on a file system have standard permission assigned to 3 distinct entities: the user who owns it, the group owner and all other users. Each entity may have a combination of read, write and execute (r/w/x) permissions assigned. You can use the ls command to look at all of this info:
ls -l mysupersecretfile.txt
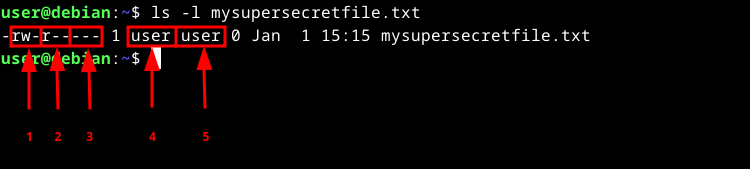
- [U]ser (owner) permissions
- [G]roup permissions
- All [O]ther users’ permissions
- Owning username
- Owning group name
By default, each newly created user is also assigned to a new primary group of the same name. In the example above, #4 is the username “user” and #5 is the group name “user”. Keep that in mind when looking at output such as this as it may be confusing at first.
The files and directories that users are allowed to modify depend on a couple of things, including whether the user “owns” it or if they otherwise have the appropriate permissions to via a group membership. Note that the root user can modify any file on the system, regardless of ownership.
This approach to file system permissions works well for most at-home and standalone setups. Of course, when you’re working with systems where multiple users are accessing the same file hierarchy, and you must give certain people access to some areas (and restrict them from others), you’ll start to understand the standard “1 owner, 1 group” methodology falls a bit short.
How ACLs Enhance the Standard Permissions Model
Access Control Lists add the ability to apply permission entries to multiple users and groups for files and directories. One example where ACLs are a good option is when you want to assign a certain user permission to a file that already has specific owner and group owner permissions assigned.
ACLs for directories follow the standard permissions r/w/x model in that they give you the ability to (r)ead (list contents, but not enter) the directory, (w)rite (create) new files and directories inside the directory, and e(x)ecute (enter) the directory.
How about an example? Let’s say you have a file, report.pdf, owned by a user, peter, with read+write permissions. You’ve additionally granted group ownership of this file to the accounting group. Now you’ve received a request to grant read access to the user named lumberg.
Let’s assume you’re using the standard permissions model. Here are a few (futile) ideas for completing this request:
- You can’t grant lumberg membership to the accounting group (that would give him access to all sorts of other files he shouldn’t be looking at).
- You also don’t want to, as a matter of proper administrative practice, create a whole new group with users from the accounting group plus lumberg, just for this file.
- You especially don’t want to open up permissions to all other users, for obvious security reasons.
ls -l report.pdf

What to do? Well, you could just take an early lunch break. However, let’s instead employ ACLs!
Checking for ACL Support on Your System
Most modern Linux distributions support ACLs out-of-the-box. Most common file systems support them, their default mount options include ACL support and default installations should include the proper packages.
To verify on ext2/3/4 file systems, use tune2fs. For example, if you want to check /dev/sda1 (which contains an ext4 file system):
sudo tune2fs -l /dev/sda1 | grep "Default mount options"

For reference, here’s a list of different file system support for ACLs, grouped by platform, written by IBM.
The getfacl Command
The getfacl command displays (gets) file access control lists for files and directories. If you run getfacl on our report file from above, you’ll see:
getfacl report.pdf
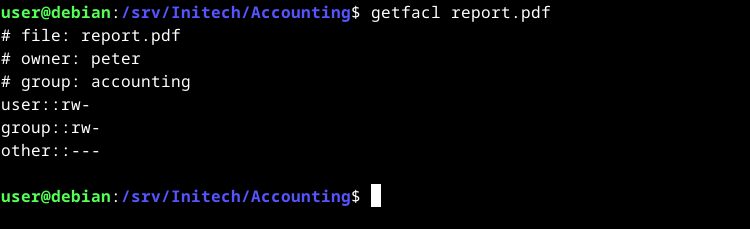
Right now the output shows the minimum ACL of the file. The minimum ACL comprises the standard permissions for the owner, owning group and all other users.
If there were an extended ACL entry for another user, let’s call them michael, we’d see this:
getfacl report.pdf
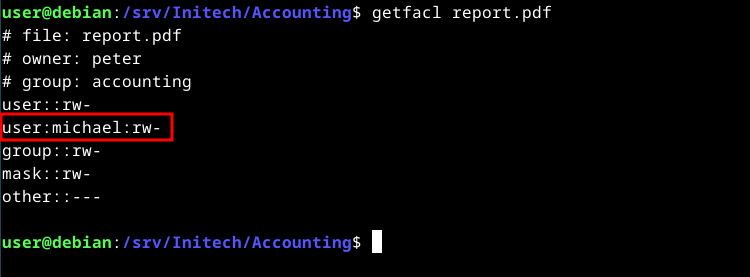
In addition to the minimum ACLs, we now have an extended ACL entry for user michael (read+write permissions). If you list the file again with extended ACLs, you’ll notice a plus (+) sign to the right of the “other users” permissions, indicating that extended ACL entries exist:
ls -l report.pdf

The setfacl Command
The setfacl command is what actually sets ACLs for files and directories. It adds and removes user and group entries, modifies permissions and other tasks like setting default ACLs on directories and working with masks. We’ll use it to complete the request above by granting the lumberg user read access to report.pdf.
To add the new user ACL entry, you’ll use setfacl with this syntax (which I’ll break down below):
sudo setfacl -m u:lumberg:r report.pdf

- -m means we’re modifying an ACL entry for the file
- u: means it’s a user we’re adding, followed by a colon (:) separator (a g: adds a group and o: adds all other users’ permissions)
- lumberg: is the username we’re adding, followed by another colon separator
- r means we’re adding read permissions (only) to the entry
- report.pdf is the name of the file we’re adding the ACL entry to
Now that this is set we can take a look, using getfacl, once again:
getfacl report.pdf
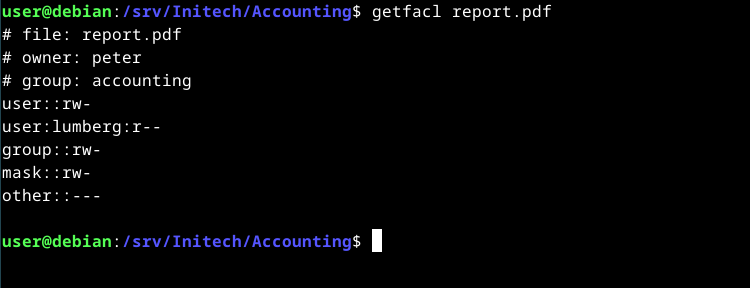
Do you spot our new entry?
Default ACLs
Default ACLs only apply to directories (folders). When you set a default ACL on a directory, the entry you specify will automatically be applied to every new file and directory within it, regardless of who creates them. It’s sort of a catch-all, recursive approach which makes it pretty useful when you’re planning your file system hierarchy.
Let’s make sure Lumberg will be able to read new files and enter new directories that are created under Accounting. We’ll use the -d option for adding a default ACL:
sudo setfacl -d -m u:lumberg:rX Accounting
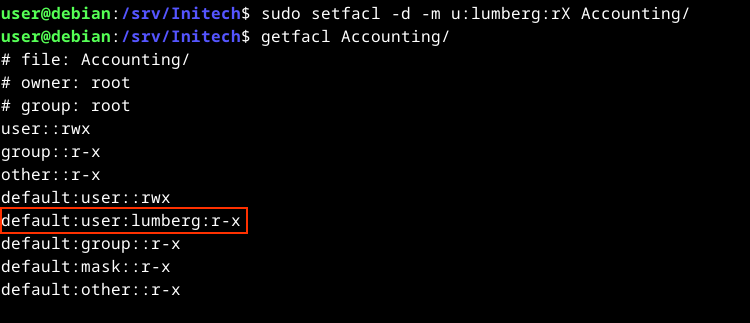
An upper-case X applies the execute permission only against new subdirectories; not files.
Access control lists are great for when you want to take your file system permissions to the next level. You can get away with a lot with standard user/group/other permissions, but there will likely be a point in your journeys where using ACLs makes much more sense.

